A WiFi temperature monitor
Purpose
- To learn how to build a wireless sensor terminal based on the embARC OSP package
- To know how to use ESP8266 module and AT commands
- To learn more about the usage of FreeRTOS operating system
Requirements
The following hardware and tools are required:
- PC host
- GNU Toolchain for ARC Processors / MetaWare Development Toolkit
- ARC board (IoT Development Kit)
- embARC OSP package
embarc_osp/arc_labs/labs/lab_esp8266_wifi
Content
Through this lab, you get a preliminary understanding of ESP8266 WiFi module and the AT command.
The lab is based on the embARC OSP package and the supports of the popular WiFi module, ESP8266. During the lab, you first use the AT command to set the ESP8266 to the server mode. Then you can use your laptop or mobile phone to access ESP8266 by IP address. You get a static webpage transmitted via TCP protocol.
Principles
ESP8266
The ESP8266 is an ultra-low-power WiFi chip with industry-leading package size and ultra-low power technology. It is designed for mobile devices and IoT applications, facilitating the connection between user devices to IoT environments.
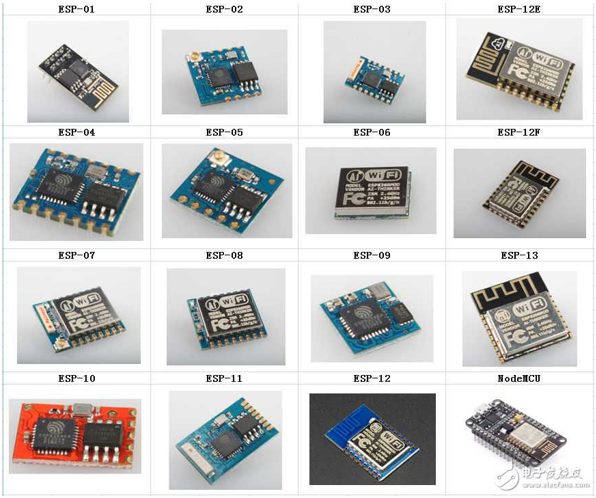
The ESP8266 is available with various encapsulations. On-board PCB antenna, IPEX interface, and stamp hole interface are supported.
ESP8266 can be widely used in smart grid, intelligent transportation, smart furniture, handhold devices, industrial control, and other IoT fields.
Ai-Thinker company has developed several WiFi modules based on ESP8266, including ESP01 and ESP01S which are used in this lab.
Note
See embARC doc to learn how to connect it with your board.
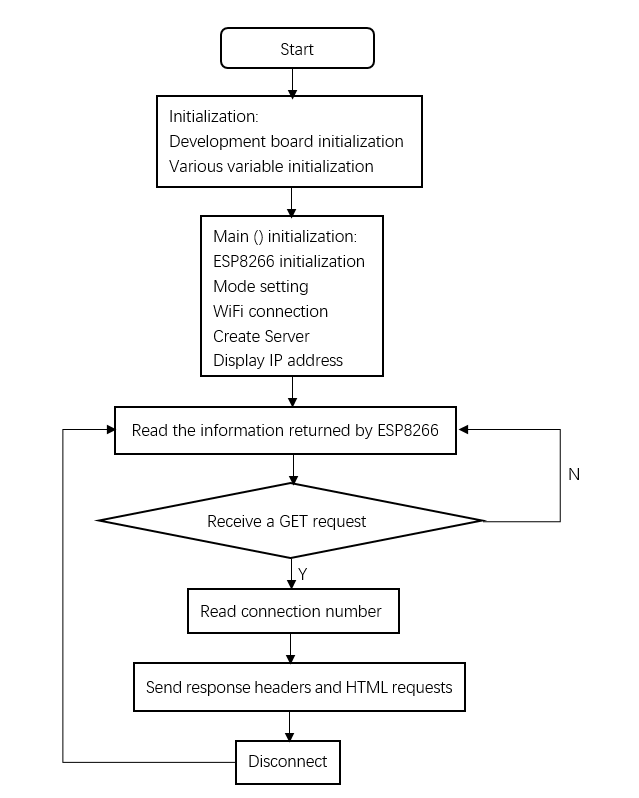
Program structure is shown below
Code is shown below
#include "embARC.h"
#include "embARC_debug.h"

#include "board.h"
#include "esp8266.h"

#include <stdio.h>
#include <string.h>

#define WIFI_SSID   "\"embARC\""
#define WIFI_PWD    "\"qazwsxedc\""

static char http_get[] = "GET /";
static char http_IDP[] = "+IPD,";
static char http_html_header[] = "HTTP/1.x 200 OK\r\nContent-type: text/html\r\n\r\n";
static char http_html_body_1[] =
    "<html><head><title>ESP8266_AT_HttpServer</title></head><body><h1>Welcome to this Website</h1>";
static char http_html_body_2[] =
    "<p>This Website is used to test the AT command about HttpServer of ESP8266.</p></body></html>";


static char http_server_buf[1024];

int main(void)
{
    char *conn_buf;

    //ESP8266 Init
    EMBARC_PRINTF("============================ Init ============================\n");

    ESP8266_DEFINE(esp8266);
    esp8266_init(esp8266, UART_BAUDRATE_115200);
    at_test(esp8266->p_at);
    board_delay_ms(100, 1);

    //Set Mode
    EMBARC_PRINTF("============================ Set Mode ============================\n");

    esp8266_wifi_mode_get(esp8266, false);
    board_delay_ms(100, 1);
    esp8266_wifi_mode_set(esp8266, 3, false);
    board_delay_ms(100, 1);

    //Connect WiFi
    EMBARC_PRINTF("============================ Connect WiFi ============================\n");

    do {
            esp8266_wifi_scan(esp8266, http_server_buf);
            EMBARC_PRINTF("Searching for WIFI %s ......\n", WIFI_SSID);
            board_delay_ms(100, 1);
    } while (strstr(http_server_buf, WIFI_SSID)==NULL);

    EMBARC_PRINTF("WIFI %s found! Try to connect\n", WIFI_SSID);

    while (esp8266_wifi_connect(esp8266, WIFI_SSID, WIFI_PWD, false) != AT_OK) {
            EMBARC_PRINTF("WIFI %s connect failed\n", WIFI_SSID);
            board_delay_ms(100, 1);
    }

    EMBARC_PRINTF("WIFI %s connect succeed\n", WIFI_SSID);

    //Creat Server
    EMBARC_PRINTF("============================ Connect Server ============================\n");

    esp8266_tcp_server_open(esp8266, 80);

    //Show IP
    EMBARC_PRINTF("============================ Show IP ============================\n");

    esp8266_address_get(esp8266);
    board_delay_ms(1000, 1);

    while (1) {
            memset(http_server_buf, 0, sizeof(http_server_buf));
            at_read(esp8266->p_at ,http_server_buf ,1000);
            board_delay_ms(200, 1);
            //EMBARC_PRINTF("Alive\n");

            if (strstr(http_server_buf, http_get) != NULL) {
                    EMBARC_PRINTF("============================ send ============================\n");

                    EMBARC_PRINTF("\nThe message is:\n%s\n", http_server_buf);

                    conn_buf = strstr(http_server_buf, http_IDP) + 5;
                    *(conn_buf+1) = 0;

                    EMBARC_PRINTF("Send Start\n");
                    board_delay_ms(10, 1);

                    esp8266_connect_write(esp8266, http_html_header, conn_buf, (sizeof(http_html_header)-1));
                    board_delay_ms(100, 1);

                    esp8266_connect_write(esp8266, http_html_body_1, conn_buf, (sizeof(http_html_body_1)-1));
                    board_delay_ms(300, 1);

                    esp8266_connect_write(esp8266, http_html_body_2, conn_buf, (sizeof(http_html_body_2)-1));
                    board_delay_ms(300, 1);

                    esp8266_CIPCLOSE(esp8266, conn_buf);

                    EMBARC_PRINTF("Send Finish\n");
            }
    }

    return E_OK;
}
Steps
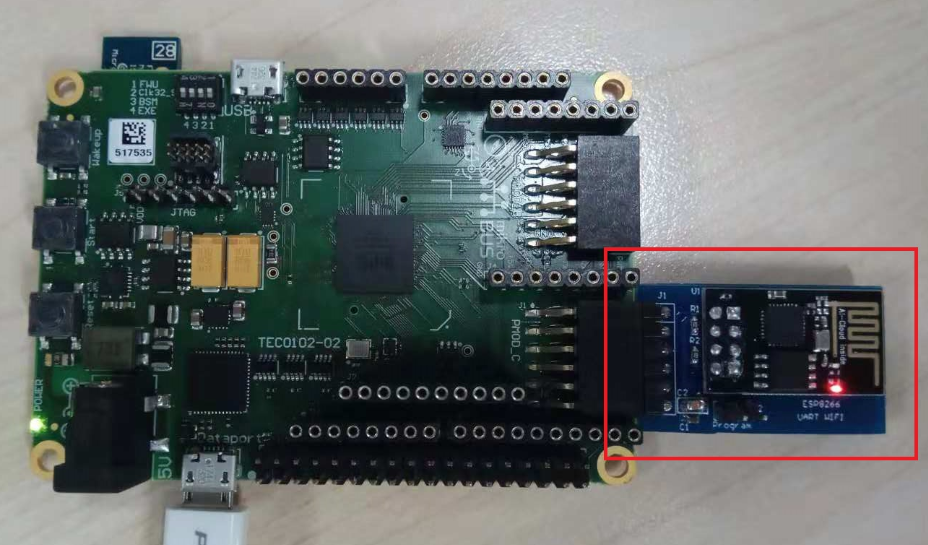
Hardware connection (as shown below)
Modify the code
Change the WiFi account and password set in the code to connect the particular wifi(as shown below).
#define WIFI_SSID   "\"embARC\""
#define WIFI_PWD    "\"qazwsxedc\""
Compile and download
Compile and download the program, after downloading successfully, the relevant download information is displayed in the command window(as shown in the following example).
[DIGILENT] This device supports JTAG7 scan formats.
[DIGILENT] Device enumeration: #0 is `IoTDK'=DesignWare ARC SDP.
[DIGILENT] We choose device  : #0 `IoTDK' from 1 possible devices.
[DIGILENT] Product=507 variant=1 fwid=56 firmware-version=10a.
[DIGILENT] It is possible to set the JTAG speed.
[DIGILENT] Current speed is 10000000 Hz.
[DIGILENT] Attempting to set speed to 8000000 Hz.
[DIGILENT] Speed was set to 7500000 Hz.
[DIGILENT] Suppress these messages with environment variable DIG_VERBOSE=0.
Initializing.  System name is ARC_DLL; my DLL was C:/ARC/MetaWare/arc/bin/freertos.
freeRTOS: there are 10 task priorities.
At this point, feedback information is shown on your serial port console, representing the process of the board establishing connection with http server with AT command (showing below).
embARC Build Time: Nov 22 2018, 14:35:34
Compiler Version: Metaware, 4.2.1 Compatible Clang 4.0.1 (branches/release_40)
=========================== Init ============================
[at_parser_init]57: obj->psio 0x800066c8 -> 0x80001330
[at_send_cmd]87: command is NULL, send AT test command
[at_send_cmd]131: at_out: "AT
" (4)
[at_get_reply]154: "AT

OK" (9)
============================ Set Mode ============================
[at_send_cmd]131: at_out: "AT+CWMODE_CUR?
" (16)
[at_get_reply]154: "
AT+CWMODE_CUR?
+CWMODE_CUR:1

OK" (38)
CWMODE_CUR = 1
[at_send_cmd]131: at_out: "AT+CWMODE_CUR=3
" (17)
[at_get_reply]154: "
AT+CWMODE_CUR=3

OK" (24)
============================ Connect WiFi ============================
[at_send_cmd]131: at_out: "AT+CWLAP
" (10)
[at_get_reply]154: "
AT+CWLAP
+CWLAP:(0,"synopsys-guest",-71,"6c:f3:7f:a8:a1:21",1,-27,0)
+CWLAP:(5,"Synopsys",-70,"6c:f3:7f:a8:a1:22",1,-27,0)
+CWLAP:(0,"synopsys-guest",-94,"d8:c7:c8:43:5b:81",1,-19,0)
+CWLAP:(5,"Synopsys",-95,"d8:c7:c8:43:5b:83",1,-21,0)
+CWLAP:(0,"iFuture",-94,"d4:68:ba:06:65:4a",1,-16,0)
+CWLAP:(4,"iFuture_City",-93,"d4:68:ba:0e:65:09",3,-4,0)
+CWLAP:(3,"embARC",-62,"5e:e0:c5:4f:df:80",6,32767,0)

OK" (416)
Searching for WIFI "embARC" ......
WIFI "embARC" found! Try to connect
[at_send_cmd]131: at_out: "AT+CWMODE_CUR=1
" (17)
[at_get_reply]154: "
AT+CWMODE_CUR=1

OK" (24)
[at_send_cmd]131: at_out: "AT+CWJAP_CUR="embARC","qazwsxedc"
" (35)
[at_get_reply]154: "
AT+CWJAP_CUR="embARC","qazwsxedc"
WIFI DISCONNECT
WIFI CONNECTED
WIFI GOT IP

OK" (88)
WIFI "embARC" connect succeed
============================ Connect Server ============================
[at_send_cmd]131: at_out: "AT+CIPMUX=1
" (13)
[at_get_reply]154: "
AT+CIPMUX=1

OK" (20)
[at_send_cmd]131: at_out: "AT+CIPSERVER=1,80
" (19)
[at_get_reply]154: "
AT+CIPSERVER=1,80
no change

OK" (37)
============================ Show IP ============================
[at_send_cmd]131: at_out: "AT+CIFSR
" (10)
[at_get_reply]154: "
AT+CIFSR
+CIFSR:STAIP,"192.168.137.236"
+CIFSR:STAMAC,"5c:cf:7f:0b:5f:9a"

OK" (84)
Access server
The serial port feedback information above shows that the board has successfully connected to the target WiFi through ESP8266. It is set to the server mode by using the AT command, and the IP address of the server is also given.
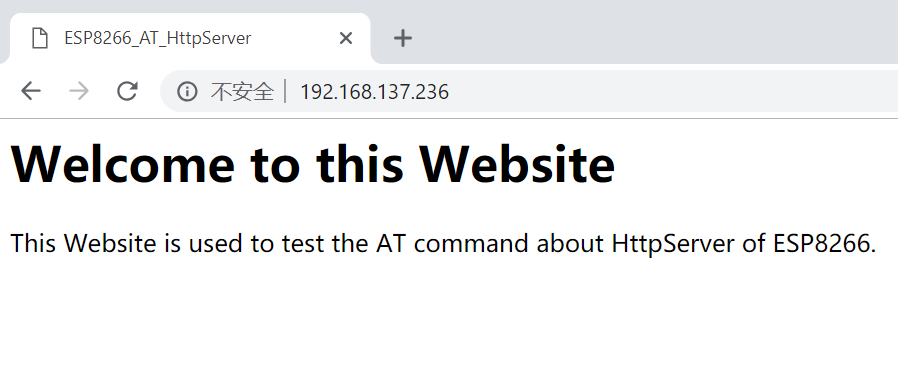
At this point, use a PC or mobile phone to connect to the same WiFi, open a browser(recommend Google Chrome for PC), and enter the IP address to see the static HTTP page. Notice the IP address that you enter should be the same IP address shown in Show IP section at your serial port console. The content of your serial port console and browser is shown below:
============================ send ============================

The message is:
0,CONNECT
1,CONNECT

+IPD,0,384:GET / HTTP/1.1
Host: 192.168.137.236
Connection: keep-alive
Upgrade-Insecure-Requests: 1
User-Agent: Mozilla/5.0 (Windows NT 10.0; Win64; x64) AppleWebKit/537.36 (KHTML, like Gecko) Chrome/70.0.3538.102 Safari/537.36
Accept: text/html,application/xhtml+xml,application/xml;q=0.9,image/webp,image/apng,*/*;q=0.8
Accept-Encoding: gzip, deflate
Accept-Language: zh-CN,zh;q=0.9


Send Start
[at_send_cmd]131: at_out: "AT+CIPSEND=0,44
" (17)
[at_get_reply]154: "AT+CIPSEND=0,44

OK" (22)
[at_get_reply]154: "
>
Recv 44 bytes

SEND OK" (30)
[at_send_cmd]131: at_out: "AT+CIPSEND=0,93
" (17)
[at_get_reply]154: "
AT+CIPSEND=0,93

OK" (24)
[at_get_reply]154: "
>
Recv 93 bytes

SEND OK" (30)
[at_send_cmd]131: at_out: "AT+CIPSEND=0,93
" (17)
[at_get_reply]154: "
AT+CIPSEND=0,93

OK" (24)
[at_get_reply]154: "
>
Recv 93 bytes

SEND OK" (30)
[at_send_cmd]131: at_out: "AT+CIPCLOSE=0
" (15)
[at_get_reply]154: "
AT+CIPCLOSE=0
0,CLOSED

OK" (32)
Send Finish
============================ send ============================

The message is:

+IPD,1,353:GET /favicon.ico HTTP/1.1
Host: 192.168.137.236
Connection: keep-alive
User-Agent: Mozilla/5.0 (Windows NT 10.0; Win64; x64) AppleWebKit/537.36 (KHTML, like Gecko) Chrome/70.0.3538.102 Safari/537.36
Accept: image/webp,image/apng,image/*,*/*;q=0.8
Referer: http://192.168.137.236/
Accept-Encoding: gzip, deflate
Accept-Language: zh-CN,zh;q=0.9


Send Start
[at_send_cmd]131: at_out: "AT+CIPSEND=1,44
" (17)
[at_get_reply]154: "AT+CIPSEND=1,44

OK" (22)
[at_get_reply]154: "
>
Recv 44 bytes

SEND OK" (30)
[at_send_cmd]131: at_out: "AT+CIPSEND=1,93
" (17)
[at_get_reply]154: "
AT+CIPSEND=1,93

OK" (24)
[at_get_reply]154: "
>
Recv 93 bytes

SEND OK" (30)
[at_send_cmd]131: at_out: "AT+CIPSEND=1,93
" (17)
[at_get_reply]154: "
AT+CIPSEND=1,93

OK" (24)
[at_get_reply]154: "
>
Recv 93 bytes

SEND OK" (30)
[at_send_cmd]131: at_out: "AT+CIPCLOSE=1
" (15)
[at_get_reply]154: "
AT+CIPCLOSE=1
1,CLOSED

OK" (32)
Send Finish
Exercises
Referring to the embARC documents, using ESP8266 and TCN75 temperature sensor to build http server to make the page display the sensor temperature in real time.